 |
To configure a valid SSL certificate; I used a free certificate "StartSSL Free"", StartCom.
The steps I followed to configure the certificate got them from the next page :
1 – To access the page : https://www.startssl.com/?app=12
2 – Click on "Express Lane", to register :

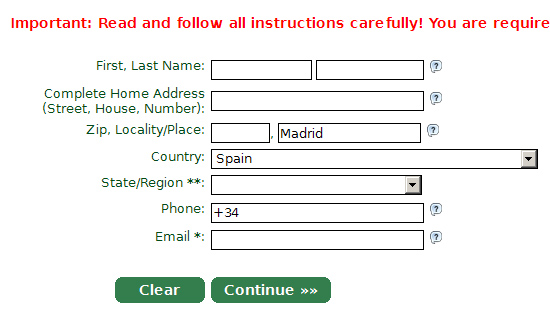
3 – Fill out the registration form :
4 – A verification email will be sent, with a code which you must enter in the next step.
5 – After entering the verification code, a Personal certificate will be installed in the Web browser,
* It is recommended to perform a backup of the certificate.
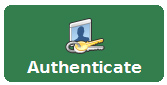
6 – We will access the section "Control Panel"", pulsaremos en "Auntenticate", and select the StartCom certificate.
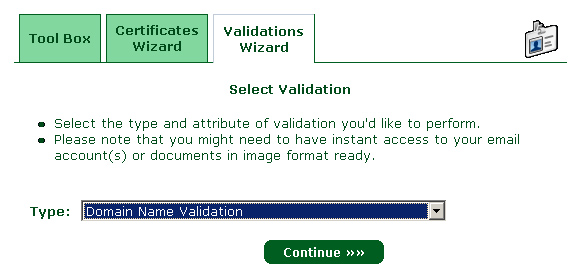
7 – Click on "Validation Wizard", Select "Domain Name Validation", and click "Continue"" :
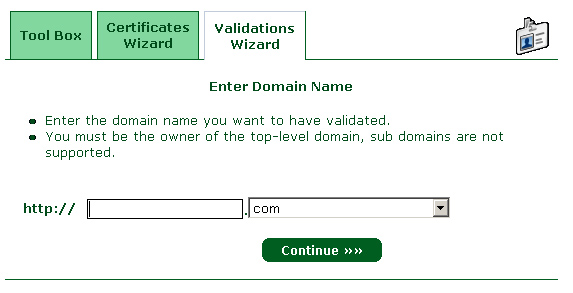
8 – We will indicate the name of the domain you want to validate (does not support subdomains):
9 – Select an email address, You will receive a verification code:
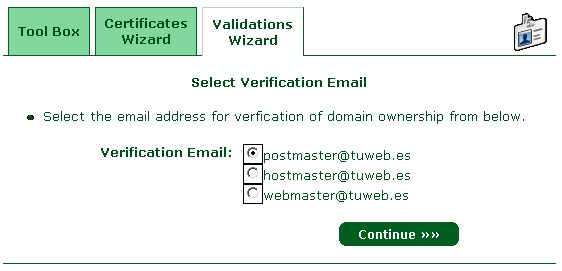
10 – In the next step, Enter the verification code, I have received by mail.
Now, We must generate a private key and a request for certificate, using OpenSsl, in my case uses a version for Windows :
http://code.google.com/p/openssl-for-windows/downloads/list
1 – Download Zip file : http://openssl-for-windows.googlecode.com/files/openssl-0.9.8k_WIN32.zip
2 – Unzip the contents in C:\OpenSSL
3 – Open the "system symbol"" in Windows ( Run / cmd ), and run the following commands :
CD C:\OpenSslbin
OpenSSL genrsa - des3 - out ssl.key 2048

Enter a password, for the private key.
openssl rsa-in ssl.key - out ssl.nopp.key
openssl req - config "C":\"OpenSslopenssl. cnf" -SHA1 - nodes - new - key ssl.key - out ssl.csr
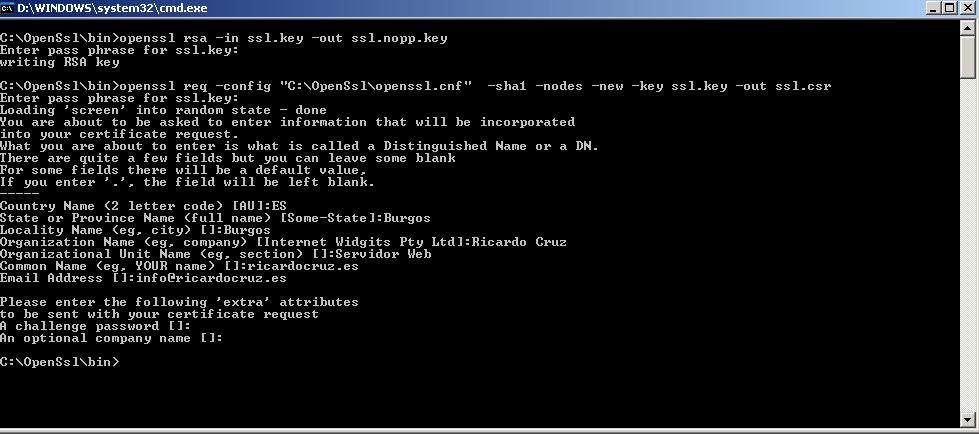
We enter the information asks us, and the fact most important "Common Name", which must be the name of the domino (or subdomain), so the are going to perform the Ssl certificate request.
Create the certificate at StartSsl
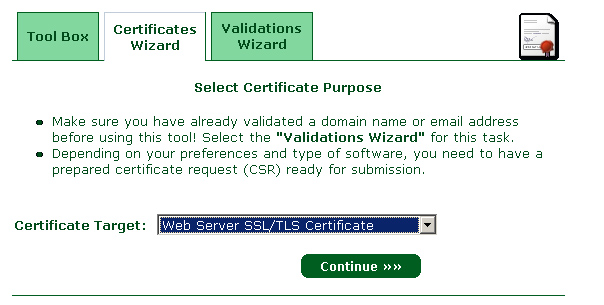
1- We are now back to enter in the page of StartSsl, and click on "Certicates Wizard", and select "Web Server SSL"…" :
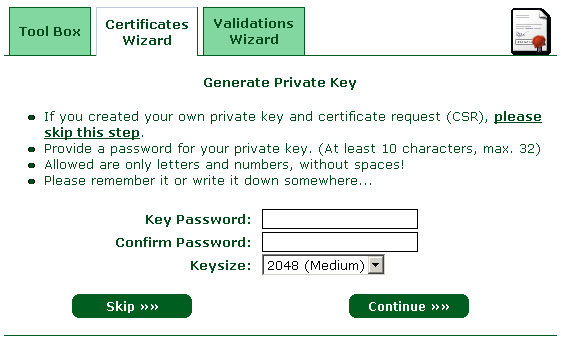
2 – In the next step, Click "Skip"" :
3 – In the next step, We paste the contents of the file "ssl.csr"" :
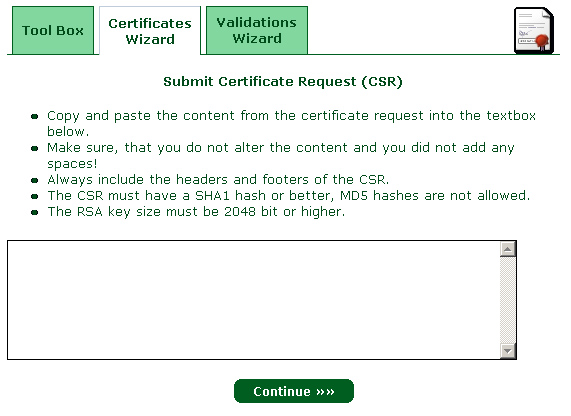
4 – In the page "Certificate Request Received", Click "Continue".
5 – In the page "Add Domain", We introduce the subdomain to which the certificate we want, EJ. SSL.mydomain.com.
6 – In the page "Ready Processing Certificate", Click "Continue".

7 – In the page "Save Certificate", copy the text of the certificate, and paste it in Notepad, and we kept it as /etc/httpd/conf/SSL.CRT/server.CRT.
* You can be, require an additional step
Instead of being able to download the certificate; won't an email indicating the approval of the certificate.

Upon receipt of the mail, We enter in the "Tool Box" section" and select the option "Raise Certificate":

"Click"Continue"", and now we can set the text of the certificate, and save it in a file named "/etc/httpd/conf/SSL.CRT/server.CRT".

Import the certificate on DiskStation
1 – Accedemos a la pagina de Administración de DiskStation.
2 – Open the Control Panel / Web services / Service / HTTP :
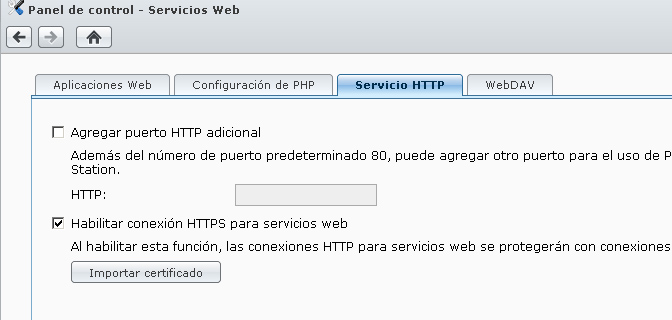
3 – Mark the Check "Enable HTTP connection"…", and click "Import certificate".
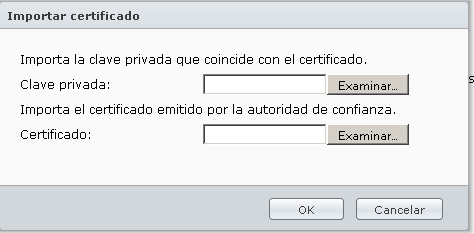
4 – In the private key, Select the file "ssl.nopp.key", and in the certificate the file "/etc/httpd/conf/SSL.CRT/server.CRT".
5 – Click "OK", and we have ready our valid SSL certificate, in our Synology disk.


Me podías explicar el paso 7 mas detalladamente, es que a partir de ahí no se seguir, no se de que certificado tengo que copiar el texto y pegarlo donde? en un archivo nuevo y renombrarlo?, sobreescribir el antiguo “ssl.crt.”? Me podías especificar un poo mas…
gracias de antemano por el tutorial
Estoy en tool box de startcom y tengo esto:
If you want to import one or more CA certificates into your browser click on the link of the certificate in question. Make sure to edit the trust settings of each imported certificate.
In order to save the certificates for your server, select the link by right clicking on it and selecting “Save Link As…” from the menu.
StartCom Root CA (PEM encoded)
StartCom Root CA (DER encoded)
Server Certificate Bundle with CRLs (PEM encoded)
Class 1 Intermediate Server CA
Class 2 Intermediate Server CA
Class 3 Intermediate Server CA
Extended Validation Server CA
Class 1 Intermediate Client CA
Class 2 Intermediate Client CA
Class 3 Intermediate Client CA
Class 2 Code Signing CA
Class 3 Code Signing CA
y me quede en el paso 7,