In the next article I will describe the steps to install the Server DLNA Serviio in a hard Synology disk. In my case, a Ds111 Synology disk, with ARM Cpu.
The information in the installation process has been obtained from the following web page:
http://pcloadletter.co.uk/2011/02/07/serviio-on-synology-nas-with-arm-cpu/
We connect via Ssh to your hard disk, and install the packages "lame"" and "nano""
ipkg install lame
ipkg install nano
A continuación, We will unload the Java version for ARM, from the Oracle website (requires registration):
http://www.oracle.com/technetwork/java/javame/embedded/download/javase/index.html
For the Synology disk with Cpu Arm (as it is is the Ds111 case), We choose the "Running Linux" version.
You can download the file, in the shared folder "public".
From the console ejcutaramos the following commands :
CD /volume1/public
MV ejre-1_6_0_25-fcs-b06-linux-arm-sflt-eabi-headless-14_apr_2011.tar.gz /volume1/@tmp
CD /volume1/@tmp
tar ejre-1_6_0_25-fcs-b06-linux-arm-sflt-eabi-headless-14_apr_2011.tar.gz
mkdir /opt/java
MV ejre1.6.0_25 /opt/java
A continuación, You must edit several configuration files, to which you can use the editor Nano or Vi; with Nano, we will use the CTRL o command to save the changes, and CTRL x to exit.
First, the configuration file of the profile for all users of the Bash Shell.
Nano /opt/etc/profile
We will carry out the changes highlighted in bold:
| # # Bash initialization script # "PS1 ="[\u@h W]$ " export LD_LIBRARY_PATH PATH PS1 JAVA_HOME |
Then for all Shell users profile configuration file.
Nano/etc/profile
In the last line, the changes highlighted in bold:
|
PATH=/opt/Java/ejre1.6.0_25/bin:/opt/bin:/opt/sbin:$PATH |
We will then unload and install Serviio :
CD /volume1/@tmp
wget http://Download.serviio.org/releases/serviio-0.5.2-Linux.tar.gz
tar xvzf serviio-0.5.2-Linux.tar.gz
MV serviio-0.5.2 /opt/serviio
To configure Serviio, We use a Web application written in PHP : Serviio Web Interface ( See )
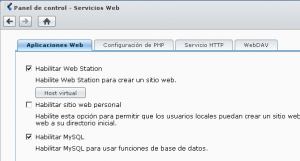
In order to make use of this application, We have given enable the Web server in the Control Panel of the DSM ; Control Panel / Web services :
CD /volume1/@tmp
wget http://Labs.softjourn.com/attachments/download/67/serviio-0.5.2.1b.zip
unzip serviio-0.5.2.1b.zip
MV serviio-0.5.2 /volume1/web/serviio
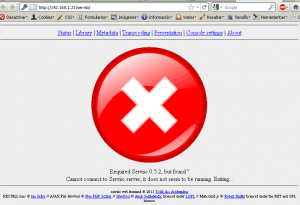
You can now access the Web Administration Serviio, http://ip_nas_synology/serviio , which will display a red X, indicating that Serviio not this started.
FFmpeg depends on libbz2 and zlib libraries, and even if they are installed with the package Optware-devel, The search FFmpeg/lib rather than on their actual location in /opt/lib.
Copy libraries where the search FFmpeg :
CP /opt/lib/libbz2.so.1.0/lib
CP /opt/lib/libz.so.1/lib
We will then unload Serviio Web FFmpeg, and what we compilaremos with choices appropriate to our ARM Cpu (The type of Cpu can be checked with : cat /proc/cpuinfo )
CD /volume1/@tmp
wget http://Download.serviio.org/opensource/ffmpeg-26303.tar.gz
tar xvzf ffmpeg-26303.tar.gz
CD ffmpeg
./Configure –Arch = arm –enable-armv5te –prefix = / opt –extra-cflags ='-I/opt/include' –extra-ldflags = "-L/opt/lib' –enable-static –disable-shared –Disable-ffplay –Disable-ffserver –enable-libmp3lame
make
Compilation with the ARM Cpu time of 1,6 Disk Ds111 GHz, is of approximately 25 minutes.
Once completed the installation, We will install FFmegp :
make install
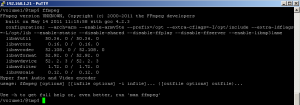
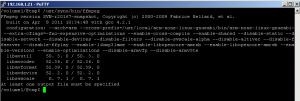
We can see that you have installed correctly, running the command ffmpeg , and by checking the date of compilation :
Incorrect version of ffmpeg :
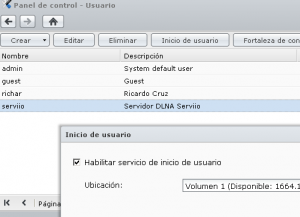
Since the DSM Control Panel, create a new user "serviio"" and grant access to the folders where they are to be video files, music and photos.
Press the button "User home", and mark the Check "Enable service"…":
A continuación, We will edit from Ssh, the password file ( !EYE¡ Very careful when editing this file, We could let the inaccessible drive ):
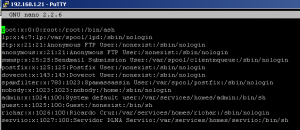
Nano/etc/passwd
Change the Shell, user "serviio", of "/ sbin/nologin"" to "/ bin/sh":
We will then create the Script for start/stop service "serviio"" :
nano /volume1/@tmp/S99serviio.sh
 #!/bin/sh

User=serviio

case "$1" in

stop)
        echo "Stop Serviio..."
        su -l $User -c "/opt/serviio/bin/serviio.sh -stop" > /dev/null 2>&1 &
        ;;

start)
        # start Serviio in background mode
        su -l $User -c "/opt/serviio/bin/serviio.sh" > /dev/null 2>&1 &
        echo "Start Serviio..."

        #check libs FFmpeg depends on (in case DSM was upgraded)
        if [ ! -f /lib/libbz2.so.1.0 ]; then
                cp /opt/lib/libbz2.so.1.0 /lib
        fi
        if [ ! -f /lib/libz.so.1 ]; then
                cp /opt/lib/libz.so.1 /lib
        fi
        ;;

restart)
        $0 stop
        sleep 1
        $0 start
        ;;
*)
        echo "usage: $0 { start | stop | restart}" >&2
        exit 1
        ;;

esac
We will give to the file "", Execute permissions and assign the user "serviio", as the owner of the folder "/ opt/serviio"" :
chmod x /volume1/@tmp/S99serviio.sh
chown - R serviio /opt/serviio
Now a change of my own harvest, It is not on the web where I obtained information to install and configure Serviio.
Although, the excellent qualities of Serviio as Server Multimedia, I have to say that installed in a Synology NAS drive, presents a couple of disadvantages :
- The high consumption of resources requiring Java
- Not indexed, files with strange characters ( Accents, FedoraForum, etc. ).
With this pair of disadvantages, and given how well it works the Multimedia Server consisting of Synology DiskStation, I chose for that the server "serviio." do not start by default, and start it manually from ssh (with putty from the computer or from the phone).
The problem, is that with "serviio" startup script" ( /opt/serviio/bin/serviio.sh ), to close the console session, the service stopped.
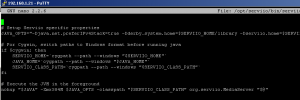
What I did was add "nohup" command, at the beginning of the last line of the file :
Nano /opt/serviio/bin/serviio.sh
We can verify that the service, starts correctly with commands :
/volume1/@tmp/S99serviio.sh start
PS | grep serviio
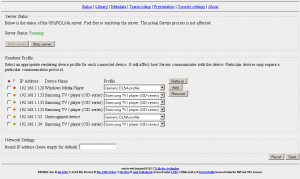
Now that the service of "serviio"" This started, We can check that the Web of administration functions correctly :
Stop the service with the command:
/volume1/@tmp/S99serviio.sh stop
If we want, that the service "serviio", start on boot disk, copy the Startup Script to the folder "/opt/etc/init.d"" :
MV /volume1/@tmp/S99serviio.sh /opt/etc/init.d
With this, We have completed the installation of the Multimedia Server "serviio"" in a Synology NAS drive.





It’s wonderful that you are getting thoughts from this article as well as from our discussion made at this place.
At the risk of somewhat ignorant view. What advantage does this DLNA server with respect to which includes Synology by default??
The list of features of Server DLNA Serviio, This on the next page : http://www.serviio.org/features
One of the advantages, It is the images available in miniature, in the Videos and music; in both cases can retrieve the Caratura from Internet.
It also supports Transcoding; is to say that if the DLNA Reproducor, It does not support a format of Video or Audio, the server is responsible for recode to flight, to a format compatible with the player;
As indicated in article, It has the drawback of memory consumption, and the problem with accents; and the integrated player works very well.