En el siguiente articulo voy a describir los pasos para instalar el Gestor de Descargas pyLoad en un Disco Duro Synology. En mi caso, un Disco Synology Ds111, con Cpu ARM.
La información del proceso de instalación y configuración ha sido obtenida de las siguientes paginas :
http://setaoffice.com/2011/04/10/how-to-install-pyload-on-a-synology-diskstation-ds211j/
http://forum.synology.com/enu/viewtopic.php?f=38&t=34051
http://www.synology-wiki.de/index.php/PyLoad
http://nas-tweaks.net/220/installation-of-pyload-on-optware/
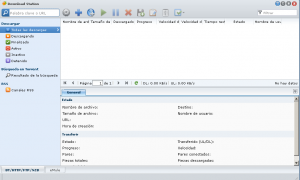
El Gestor de Descargas integrado en DiskStation "Download Station" (Ver), permite múltiples formatos de descarga : BitTorrent, FTP, HTTP, eMule, RapidShare, Megaupload, etc.
Bien, el problema es que la descarga de ficheros de sitios como RapidShare o Megaupload, solo es posible a través de cuentas Premium.
Buscando una alternativa, para poder descargar de este tipo de sitios, sin necesidad de cuentas Premium, encontré el software pyLoad; y la información para instalarlo y configurarlo en un Disco Nas Synology.
Como requisito previo, es necesario haber modificado el Servidor Synology, para poder instalar paquetes ipkg; los pasos fueron descritos en un articulo previo (Ver).
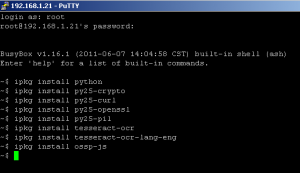
Nos conectaremos por Ssh, e instaleramos los paquetes "python, py25-crypto, py25-curl, py25-openssl, py25-pil, tesseract-ocr, tesseract-ocr-lang-eng, ossp-js" con los comandos :
ipkg install python
ipkg install py25-crypto
ipkg install py25-curl
ipkg install py25-openssl
ipkg install py25-pil
ipkg install tesseract-ocr
ipkg install tesseract-ocr-lang-eng
ipkg install ossp-js
ipkg install unrar
A continuación descargaremos los Ficheros Fuente de la ultima versión de pyLoad :
cd /opt
wget http://get.pyload.org/get/src/0.4.6/
unzip pyload-src-v0.4.6.zip
rm pyload-src-v0.4.6.zip
cd pyload/
A continuación cambiaremos el directorio de configuración :
cd module/config/
echo "/volume1/pyload" >> configdir
Daremos permisos de ejecución a pyLoad :
chmod +x /opt/pyload/pyLoadCore.py
Iniciaremos pyLoad :
python /opt/pyload/pyLoadCore.py
Al ser la primera ejecución, se iniciará el asistente de configuración, el cual se entiende bastante bien, aunque aquí os dejo el Asistente en Ingles :
|
A continuación, crearemos el script de inicio, para que el Servicio pyLoad se inicia automáticamente al encender el disco.
Para ello, crearemos el script en la carpeta /opt/etc/init.d/ :
nano /opt/etc/init.d/S99pyload.sh
Código del Script :
| #!/bin/sh # # Start / Stop Script for PyLoad http://localhost:8000 # prefix="/opt" PATH=${prefix}/bin:${prefix}/sbin:/sbin:/bin:/usr/sbin:/usr/bin NAME="PyLoad" DAEMON="python /opt/pyload/pyLoadCore.py –daemon" DAEMON_OPTS="" # # start() { echo "Starting Service: $NAME" $DAEMON $DAEMON_OPTS | awk '{print $3}' >/var/run/pyload.pid } # stop() { kill `cat /var/run/pyload.pid` } # case "$1" in start) start ;; stop) stop ;; restart) stop sleep 4 start ;; *) echo "Usage: $0 (start|stop|restart)" exit 1 ;; esac # # End |
Daremos permisos de ejecución al script de inicio :
chmod +x /opt/etc/init.d/S99pyload.sh
Podemos crear un Icono de acceso a la Web de Administración de pyLoad, desde el Panel de DiskStation (DSM)
cd /usr/syno/synoman/webman/3rdparty
wget http://dl.dropbox.com/u/3001640/webman.pyload.tar.gz
tar xvfz webman.pyload.tar
rm webman.pyload.tar
Sino hemos configurado el acceso a la web de pyLoad con el puerto por defecto (8000), deberemos editar el fichero de configuración application.cfg ; y cambiaremos el parámetro port :
nano /usr/syno/synoman/webman/3rdparty/pyload/application.cfg
* En el momento de escribir este articulo, acababa de estar disponible la versión 0.4.6, y también en formato ipkg ( http://pyload.org/download )
No he tenido tiempo de probar la instalación (mucho mas simple), pero los comandos de instalación serian los siguientes :
ipkg install tesseract-ocr tesseract-ocr-lang-eng ossp-js unrar
wget http://get.pyload.org/static/pyload-v0.4.6-noarch.ipk
ipkg install pyload-v0.4.6-noarch.ipk
pyLoadCore -s
El ultimo comando es el de configuración.


Gracias por compartir sus pensamientos. Agradezco sus esfuerzos y estoy esperando una vez más su agradecimiento post más.
Ricardo muy buena tu explicacion, actualmente compre un Synology NAS 712+, y veo que tu publicaiocn ya lleva mas de un año. Queria saber que tan desactualizada se encuantra con todos los cambios que hay actualemente en Synology DSM. Como ser ahora hay para instalar un paquete de Python, que por lo que veo es la misma empresa que Pyload (corregime si me equivoco) sera mas facil la instalacion si le instalo este paquete?. Disculpa mi ignorancia. Espero tu respuesta.
Muchas gracias
Cuando escribí el articulo, no estaba disponible el Paquete IPK; y lo escribí para tener anotado el proceso, por si tenia que repetirlo.
La mejor opción, es instalar el Paquete IPK, con los comandos que se indican en la pagina de descarga de pyLoad : http://pyload.org/download
Puede ser necesario instalar antes algunos paquetes :
ipkg install python py25-crypto py25-curl py25-openssl py25-pil tesseract-ocr tesseract-ocr-lang-eng ossp-js unrarMe gustaría desinstalar el pyload. ¿Podrías escribir un manual y decirme como puedo desinstalarlo?
Muchas gracias.
Si lo instalaste con el paquete ipk, tendrias que ejecutar un comando similar a :
ipkg remove pyload-v0.4.6-noarch.ipk
Sino, tendrias que seguir estos pasos (comandos desde la shell) :
1- Detener pyLoad con : /opt/etc/init.d/S99pyload.sh stop
2- Borrar la carpeta de pyLoad : rm -R /opt/pyload
3- Borrar el script de inicio : rm /opt/etc/init.d/S99pyload.sh